Simple BEM calendar
First of all, a little preface. A couple of weeks ago I got to know about Frontend Developer School run by HeadHunter. The entering assignment was to make a simple calendar. This issue seemed to be quite interesting for me and I decided to solve it using new bem-core library.
This article is divided into five parts:
- Design tells you how I designed my mini application.
- Tools teaches you which tools make are handy and make your development cozy.
- Development is dedicated to established solutions and problems.
- Testing shows you how I tested my project and made it stable.
- Continuous integration is the last one and it tells you about automatization.
Note. It is a long article. If you do not want to read the whole post please go to project page on github for short version :)
Note. If you are not familiar with BEM methodology and want to learn more, bem.info is the best choice.
Let us start with Design part.
Design
BEM methodology teaches you that a first step of building web site is to mark out page blocks. In my case it is an easy peasy issue because of the simplicity of this page.
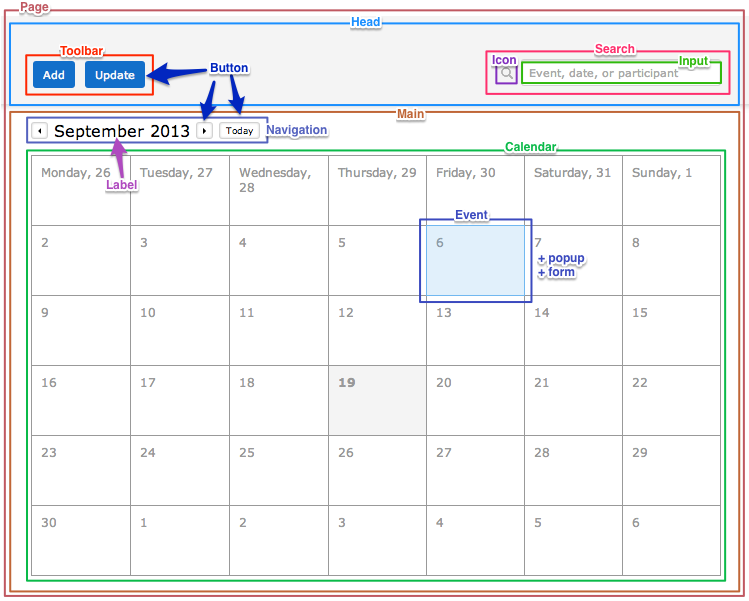
I have only four major blocks:
- Toolbar with a couple of buttons.
- Search block with input and icon.
- Calendar navigation.
- And calendar itself.
I marked blocks on the screenshot below:
The next step is much more interesting. How to connect these blocks and make the application work?
It seems that I need a small but robust architecture for the calendar.
I liked the approach presented by Nicholas C. Zakas and called Scalable JavaScript Application Architecture. The major idea is to divide responsibility and business logic among several layers of an application. Each layer has knowledge only about adjacent layers.
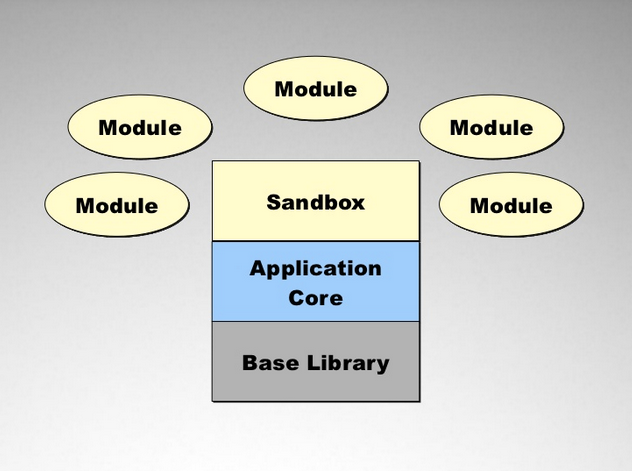
In my case this paradigm does not work completely because of bem-core. I will explain the reason later but now a couple of words about the library.
In the official page we can read the following definition:
bem-core is a base library for web interface development. It provides the minimal stack for coding client-side JavaScript and templating.
bem-core uses special module system that is not officially named yet; so I call it just YMaps Module System (YMS). It solves problems such as asynchronous require and provide which are absent in AMD and CommonJS. It is a compact and robust module system; therefore, I strongly recommend you to try it in your new project.
bem-core provides a lot of useful modules (and the module system itself) but I have included this library in the project because of i-bem. It is a helper for creating BEM blocks in declarative way.
So why cannot I implement this paradigm completely? The case is bem-core uses jQuery which penetrated into all parts of i-bem. As a result you have to use jQuery in your BEM blocks because blocks know about base library.
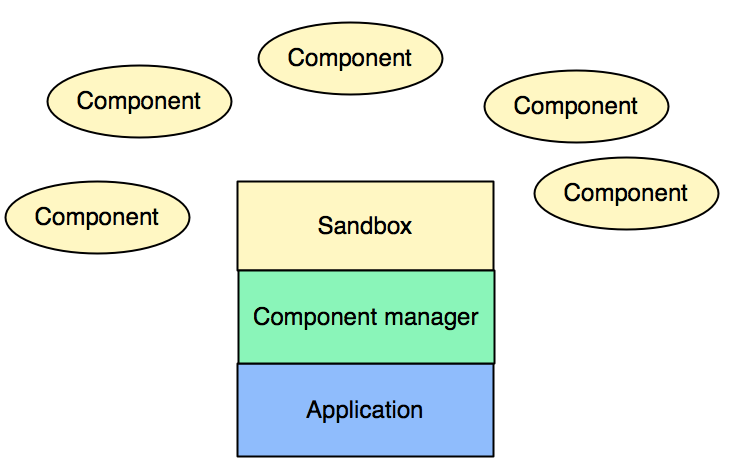
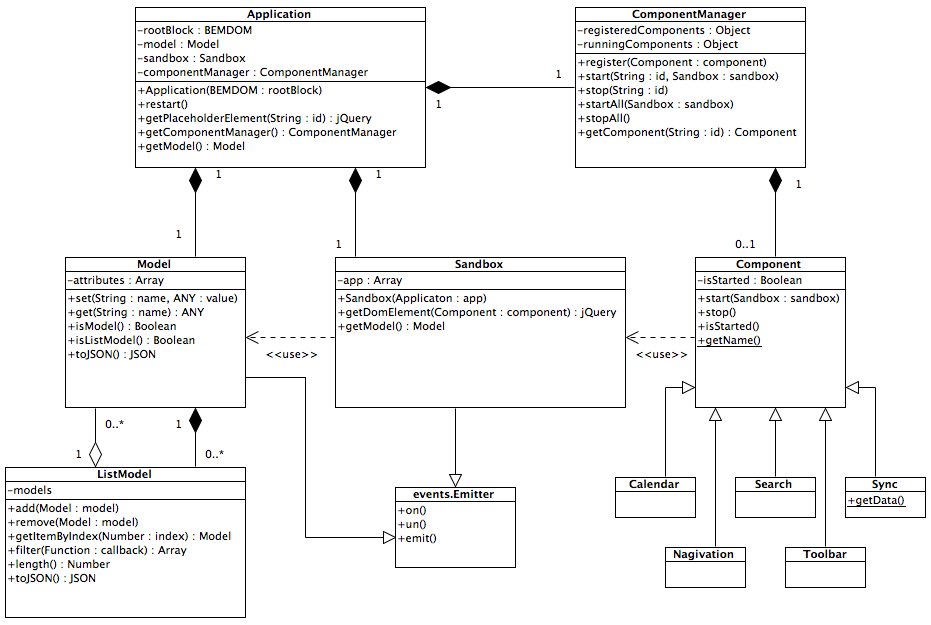
My architecture overview is presented in a diagram below:
As you can see that BEM is not displayed on the diagram. In my opinion base architecture should not depend on BEM or other methodology.
There are a few differences from Zakas approach:
- Every layer is aware of the base library: everything needs jQuery :)
- Component manager is responsible for starting and stopping components.
- Modules are named components because I already have modules from
YMS(conflict names).
For storing an application data I use a simple active model which can be accessed through the sandbox, too. However, components do not know where the model comes from. That is important.
I have only four visual components:
CalendarNavigationSearchToolbar
And one (Sync) is non-visual for synching my application with localStorage.
Each component represents itself using BEM block with the same name (not necessary requirement). Once a component has been started, it creates BEM block as a View-Controller and puts it into DOM node taken from the Sandbox.
In the calendar the components work as controllers an communicate only through the model i.e. indirectly. Also I want to emphasize that the components are very simple mediators. The majority of code is concentrated in BEM blocks.
More details you can see on the class diagram:
Application start sequence is obvious and straightforward:
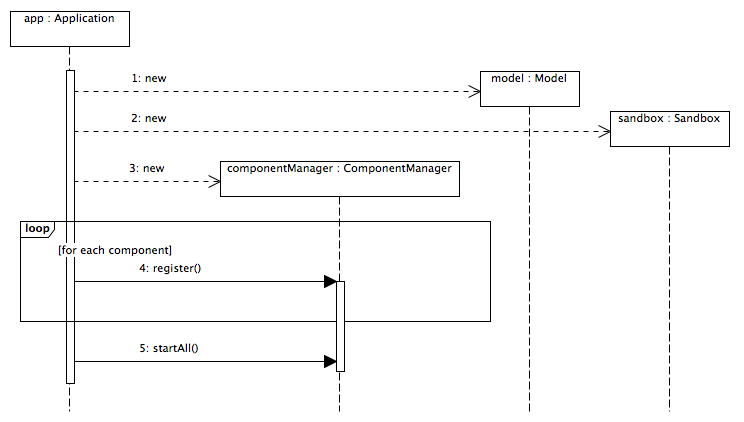
It looks quite simple and works the same way ;)
I wanted to achieve a stable core of my application; therefore, I had defined interfaces for major classes:
They are the boundary elements of my application. Sandbox connects application and components. Components connect with BEM blocks which implement IBemView interface.
Using interfaces is always increasing stability of your application.
Tools
When you use BEM your code is divided into great number of blocks. Then files will be concatenated and minified. Of course we can do it manually but usually we use special tools for this issue.
At first, it was a make-platform. Then bem-tools were created. And then enb came.
enb is a powerful and fast builder. In development mode you even do not notice that your files have been built. It works just amazingly!
Also enb has a perfect documentation (at this moment only Russian version available), a range of technologies, and easy way to create new ones. New versions with fixed bugs and improvements are published frequently. I strongly recommend you to use this builder for your BEM projects.
Moreover, enb makes it possible to get rid of dependencies for javascript modules because it can read them from YMS declarations. As a result I have added only 7 files with dependencies!
bem-core recommends you to use BEMHTML template engine by default. However, I recommend to use bh template engine. It is small, easy to use, and much faster than BEMHTML. You just write CommonJS modules:
module.exports = function (bh) {
    bh.match('button', function (ctx) {
        ctx.tag('button');
    });
};
Next two tools are about validation javascript code: jshint-groups and jscs.
The first of them is a jshint wrapper. It provides possibility to add different rules for checking files with jshint. There are tests, templates, client, and server javascript in your project. Now you can write separate and suitable jshint rules for all of them. It is a flexible way to lint your code.
jscs is a javascript codestyle checker. It will make sure that your code is written in one consistent codestyle! It provides a lots of predefined rules. If you do not find suitable rules you can add new ones.
The last one is csscomb. This tool formats your CSS code. I love when CSS rules are formatted in the same order and are divided into groups. In my opinion such nice-looking code is easy to read and maintain.
So what we have: enb, jshint-groups, jscs, and csscomb. This is a bunch of great tools and I advise you to use them in your everyday development.
Development
BEM claims that you should create absolutely independent blocks. In CSS blocks should be aware only about their elements and they do not have any knowledge about possible nested blocks. In order to change the style of nested blocks use mixins.
For example, see bemjson for search block
{
    block: 'search',
    content: [
        {
            block: 'icon',
            mix: [
                {
                    block: 'search',
                    elem: 'icon'
                }
            ],
            mods: {type: 'loupe'}
        },
        {
            block: 'input',
            mix: [
                {
                    block: 'search',
                    elem: 'input'
                }
            ]
        }
    ]
}
I mixed the elements of search blocks with nested icons and input blocks. For instance, it makes it possible to write CSS for position of icon block.
.search__icon
{
    position: absolute;
    top: 50%;
    left: -20px;

    margin-top: -6px;
}
If I decide to change icon block to megaicon block, I will not need to change styles in the search block. Cool, hah?
The possible drawback is conflict styles of nested block and mixin. But I accept this shortcoming. It is kind of fee for such magic as mixins.
In javascript i-bem provides methods like findBlockInside/findBlockOn for finding nested blocks. It also provides methods findBlockOutside/findBlocksOutside which conflicts with the idea of independent blocks. I do not recommend to use this method in your project. Just disable them.
All javascript modules are wrapped using YMS. For example,
modules.define('i-bem__dom', function (provide, DOM) {

    DOM.decl('label', {

        setText: function (text) {
            this.domElem.text(text);
        },

        getText: function () {
            return this.domElem.text();
        }

    });

    provide(DOM);

});
However, declaration for navigation looks in a different way
modules.define('search', [/** deps **/], function () {

    provide(DOM.decl('search', {
        // ...
    }));

});
Please pay attention to module naming. In the first case it is i-bem__dom but actually it is declared as label. In the second case I declared the module with appropriate name. Why did I declare modules in two different ways?
Definition depends on how you use the module in your application.
Search module has been created manually in the search component; so, the code would be executed during the application initialization. On the other hand label is used latently in form_type_event. This block should be initialized by executing DOM.init. After that i-bem inits only blocks declared in special way, i.e. as i-bem__dom module.
Be careful declaring your modules.
Testing
When you work in a big company like Yandex your application is always intently checked by testing team.
I am proud to say that we have an unbelievable testing team! Guys are really incredible! They can find bugs which can be reproduced in a very tricky way (sometimes I really hate them, lol). After careful check your application can be published in production without any doubts.
However, this project is not a part of my job and I do not have great testers to verify my application. Therefore I undertook three steps to create a stable application.
First step is a linting code with jshint and jscs. I have already told you about them in Tools part. After this step I got consistent code.
Unit testing is the next step. In my opinion tests are an important part of your code. Using phantomjs to run tests in console or automatically after each commit, can speed up development and refactoring.
Honestly, I usually write tests only after I have completed structure (backbone) of an application. I do not use TDD approach. Anyway without unit tests I have no guarantee that my application works properly :)
I think it does not matter what kind of framework you choose for unit testing. For instance, I used mocha + chai + sinon for BEM calendar. Unit testing cannot completely save the day, though. They do not test the application in different browsers.
I have a macbook and can test my calendar only in couple browsers and on one platform. First idea was to download virtual machines from modern.ie. But I do not have much time to test the calendar in all virtual machines.
So my choice is BrowserStack with a wide range of browsers and platforms. Firstly, this service runs your site in various browsers (25 in free version) and creates screnshot for each of them. If you noticed an error on a screenshot you can run virtual machine in browser to explore its reason in detail.
I hate doing extra actions for testing. So I created a special page calendar-test where my testing script adds event and opens popups. Now I can quickly verify work of my application.
Linting code, unit testing, and browserStack help you to make an application very stable. Use them wise.
Continuous integration (CI)
CI is a good way to be calm about your project. At work I usually use TeamCity by JetBrains which is perfectly suitable for our work issues. Teamcity helps to automate everything in our development process and does it well. Unfortunately our teamcity server is not opened for everyone. Moreover Teamcity is not free and you should own a server for setting it up.
To be honest I did not want to buy server for this project; so, I chose Travis which is perfectly suitable for projects hosted on github.
Many developers have heard about CI because it is in a fashion but they never used it. Why? Is it so complex to set up? Or could only serious guys use it? It is a myth. Try Travis. Probably it is the easiest CI tool to set up.
You have to do only three steps:
- Sign in Travis CI and activate GitHub service Hook for your project.
- Add .travis.yaml file to your repository.
git push
Travis CI config is rather simple. You need to specify only language and nodejs version.
language: node_js
node_js:
- 0.8
This configuration is sufficient for linting your code and running unit tests! Do not forget to add scripts section in your package.json.
But I wanted more. My goal was to regenerate my demo after each successful build when all tests have been passed. I googled a blog post with a solution.
In a nutshell, you should teach Travis to authenticate to your repository with push permission.
- Create a github access token.
- Encrypt your token and put it into a travis config so no one can use your token and break into your repo.
gem install travis
travis encrypt -r <user>/<repository> GH_TOKEN=<token> --add env.global
After that action travis can not only clone your project repository but also push some changes to it. So I wrote a script update-gh-pages.sh and appended a new directive to travis config:
after_success: ./update-gh-pages.sh
Now travis regenerates my demo for each push. It works like a magic.
Conclusion
BEM calendar is a very simple application but this article is not about creating calendars. My goal is to show you principles of good development:
- Develop the design of your application carefully and lay the groundwork for future possible features.
- Use tools which help you write more accurate and stable code.
- Test your code not only with unit tests but use crossbrowser tests, too.
- Automate everything you can.
I hope this article provide will be useful for you further projects.
And thanks to all those courageous who read this article down to the end :)
Thanks
I want to say a special thank to my girlfriend for invaluable support and making this post much better.
Also I thank everyone who helped me to improve the post. Special thanks to ignovak, dfilatov, and dodev.